You wonder how to make An Adirondack Chair that would
look good on any deck or in any garden?
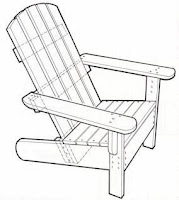 Buildling an Adirondack chair can be done easily following a few simple instructions!
There are 7 steps to complete in order to get one of the most comfortable chairs!
Throughtout this project all measurements are given in both metric (mm) and standard imperial (ft and inches).
When selecting the wood for this Adirondack chair project make sure that it is suitable for exterior use.
The seat slats [g] will have to be ripped (cut lengthways) out of 140mm x 20mm (3/4" x 5 1/2") stock using a circular power saw or bench saw.
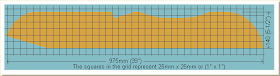
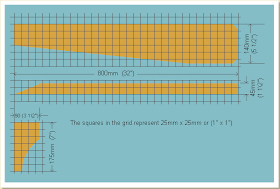
How to make a card pattern using a grid
Each grid is in increments of 25mm or 1" squares so you can work in either metric dimensions or inches.


By now all the Adirondack chair pieces should be cut to length and shape.
Assemble the lower portion of the chair [pieces a, b, d, and g] on an even surface ensuring that the two side frames (a) are the correct distance apart according to the plans.
Use an exterior type glue and pre-drill all screw holes.
Use an exterior type glue and pre-drill all screw holes.

Drill and bolt the front legs [c] to the side frames [a] using 10mm (3/8") galvanized carriage bolts.

Use an exterior type glue and pre-drill all screw holes.

Adirondack chairs are becoming popular as outdoor seating available at cafés, because the arms control plans are suitable for food and beverages on, making it possible to provide specific arrangement of seating without using tables
Another example
Source : http://www.thingstobuild.com/
look good on any deck or in any garden?

There are 7 steps to complete in order to get one of the most comfortable chairs!
Throughtout this project all measurements are given in both metric (mm) and standard imperial (ft and inches).
When selecting the wood for this Adirondack chair project make sure that it is suitable for exterior use.
 |
| Click Image to Enlarge |
Step 1. Cut the pieces to length
Cut all the Adirondack chair pieces to the lengths as given in the cutting list on the previous page.The seat slats [g] will have to be ripped (cut lengthways) out of 140mm x 20mm (3/4" x 5 1/2") stock using a circular power saw or bench saw.
Step 2. Shape the chair frames
Make a card pattern for the Adirondack chair frames using the grid below.How to make a card pattern using a grid
Each grid is in increments of 25mm or 1" squares so you can work in either metric dimensions or inches.
- 1) Cut a piece of card bigger than the required piece of wood.
- 2) On the card draw horizontal and vertical lines 25mm or 1" apart making a grid with 25mm or 1" squares.
- 3) Using the grid plan below as reference, draw the same outline shape onto the card using the same crossing points on the card grid as on the plan grid.
- 4) Cut out the outline shape on the card and use that as a pattern for the wood.

Step 3. Shape the top back support
Mark and cut the Adirondack chair top back support [i] using the grid below to make a pattern.Step 4. Shape the bottom back support
Mark and cut the Adirondack chair bottom back support [d] using the grid below to make a pattern.
Step 5. Shape the back slats
Mark and cut the Adirondack chair back slats [e] using the grid below to make a pattern.
Step 6. Shape the arms and arm supports
Mark and cut the Adirondack chair arms and arm supports [h, f] using the grid below to make a pattern
Step 7. Assemble the lower portion
By now all the Adirondack chair pieces should be cut to length and shape.
Assemble the lower portion of the chair [pieces a, b, d, and g] on an even surface ensuring that the two side frames (a) are the correct distance apart according to the plans.
Use an exterior type glue and pre-drill all screw holes.
Step 8. Assemble the side portions
Assemble the two side portion of the chair [pieces c, f, h, i and j] ensuring all dimensions are according to the plans.Use an exterior type glue and pre-drill all screw holes.

Step 9. Join the side portion to the lower portion
Fix the assembled side portion of the Adirondack chair to the assembled lower portion.Drill and bolt the front legs [c] to the side frames [a] using 10mm (3/8") galvanized carriage bolts.

Step 10. Add the back slats
Now just simply a matter of fixing the back slats [e] to the top and bottom back supports [d, i]Use an exterior type glue and pre-drill all screw holes.

Adirondack chairs are becoming popular as outdoor seating available at cafés, because the arms control plans are suitable for food and beverages on, making it possible to provide specific arrangement of seating without using tables
Another example
 |
That's it! Done!
Source : http://www.thingstobuild.com/